Monday, October 28, 2013

Spider Cakes - Not Just for Halloween

Recipe credit: Not Martha


I'm a bit late jumping on the Halloween bandwagon; with Halloween falling on Thursday this week, most parties were held this past weekend. But for the lucky few, who will be throwing a party the weekend after Halloween, this is for you!

And these don't need to be just for Halloween - maybe you are having a dinner party for that entomologist or arachnologist in your life, or a child's creepy crawly party, or just because - because they are too darn cute.


Don't fill your cavities more than half full; you don't want a dome to form. If you happen to get a large dome, just take some dental floss and cut them off so your spider will sit level.


Make sure to grease and flour your pan well. Some bakers swear by the baking spray with flour. I have not used this product; but as you can see in the upper right-hand photo, I had problems with two of the six sticking to the pan.
 
I found this cute idea over at Not Martha. She mentioned she wished that she had glazed the cake. Personally, I think it looks better left plain. She also filled her cakes with whipped cream and a raspberry coulis.


If you don't want to glaze your spiders, and don't want to deal with filling them with cream and fruit as Megan at Not Martha did, you can always pipe some of the frosting into the cake itself by inserting a small decorating tip into the bottom of the cake in two or three places.

The cake recipe I used is from the back of the Hershey's cocoa powder container. It is so soft and moist, it really doesn't need much icing. For the head and legs, I used Betty Crocker tub frosting (gasp!) So unlike me to use a packaged frosting. Normally I would make a ganache for this - but laziness won out.

For this recipe I used a Wilton mini-ball pan, and made only half recipe of the Hershey's cake recipe - this yielded six spider bodies, with a little left over - maybe enough for one or two more bodies.

Staying with the spider theme - here is a picture of a tarantula we saw on our hike this past weekend. :)


Thursday, October 24, 2013

Halloween Fun | Shrunken Apple Heads in Cider


As I was doing an internet search for adult Halloween libations, I came across this cute idea! I had to send it to my sister, she who has a Halloween party every year; and I thought this would be cute for her to make for her students. She agreed. She came over for our regular Tuesday night get together and we made these fun apple heads for her Halloween movie "night" for her class.


 These were really easy to make. The carving went much faster than we thought it would. 

After your apples have been peeled, sliced in half, and cored, they are ready for carving. After carving, the apples are placed in a lemon juice and salt mixture for one minute, then drained on paper towels before baking.

 The brown spots are bruises - the consequence from buying bagged apples. 

 
The instructions say to bake the apples for about ninety minutes, or until the apples are dry and begin to brown. Our apples took twice as long! Three hours! 

 
The pupils are made by inserting whole cloves into the eyes.

Serve the cider in wide mouth cups so that everyone can have a creepy head in their cup. If you wish, you can add some spiced rum for an adult party.

You can find the recipe and complete instructions here.


Wednesday, October 23, 2013

WW: Dry-Fried Sichuan Beans

Wok Wednesdays wokking through Stir-Frying to the Sky's Edge
by Grace Young


Fabulously delicious!

This is my new favorite way to prepare green beans. I thought the yin yang beans we made back in July 2012 were good (and they are!), but these are even better. The flavor is incredibly intense for having such few ingredients. 

I almost passed on this recipe for I was just not in the mood to make a special trip to the Asian market, and the last time a recipe called for Sichuan preserved vegetable, I only used a small amount and ended up tossing out the rest. I found that different types vary in flavor - a lot.

The canned was extremely salty and not spicy at all; down right nasty in my opinion. If available, I highly recommend the fresh, found in the refrigerated section of your Asian market. How did I know what the bag said? A fellow wokker posted a similar picture on the Wok Wednesday Facebook page. And the sticker on the shelf read pickled vegetable. The canned ingredient reads mustard stem, where the bagged reads pickled radish. The bagged, if not the correct ingredient, was great in this dish!

As with all stir-fries, your ingredients need to be as dry as possible before cooking to avoid hot splatters of oil. This recipe requires the green beans to be bone-dry before starting; I rinsed my beans a couple of hours before, gave them a spin in the salad spinner, and allowed them to continue to air dry in the perforated bowl of the salad spinner on the counter until it was time to prepare dinner.

Dry stir-frying is different from our usual way of stir-frying. Here we cook the beans at a lower temperature and for a longer period of time to intensify the flavor. The beans are tossed in the wok and then left undisturbed for one minute to brown and caramelize - this is repeated five to six times until most of the beans have some color to them.

 The bone-dry beans. :)

 Mise en place.

Bowl 1:  Green beans
Bowl 2:  Salt
Bowl 3:  Oil
Bowl 4:  Ginger
Bowl 5:  Pork
Bowl 6:  Preserved vegetable
Bowl 7:  Sugar
Bowl 8:  Soy sauce

The beans after being "dry-fried" are removed from the wok and put aside. You then stir-fry the ginger and pork before returning the beans to the wok, along with the preserved vegetable, sugar, and soy sauce.

 The most delicious green beans you ever had, await you.

 Those orange-ish looking squares are the preserved vegetable. So delicious..


We are asked not to post the recipes here on our blog. If you would like the recipe, you will find it on page 233 of Stir-Frying to the Sky's Edge, which you can purchase at your local bookstore or find it at your local library. I highly recommend purchasing the book - you won't be disappointed. 
 
Wok Wednesdays is an online cooking group. If you would like information about joining us, click here, or visit us on Facebook. Would love for you to wok along with us!


Friday, October 18, 2013

TWD: Apple Danish Braid and a Pinwheel

Tuesdays with Dorie baking through Baking with Julia
by Dorie Greenspan
Contributing Baker: Beatrice Ojakangas 


The dough for this recipe is a laminated dough, much like what we used when we made croissants, but way easier and less time consuming. Those of you unfamiliar with the term laminated dough - this is where a slab of butter is enrobed with dough, then rolled, folded (like a business letter), rolled, folded - several times. The more you roll and fold the dough, the flakier your pastry will be.

For this recipe, the butter was sliced in large pieces and pulsed for a very short time (you want the butter to be no smaller than 1/2-inch in diameter) in a food processor with the flour, before being mixed ever so lightly with the rest of the ingredients, then chilled overnight before proceeding with the rolling and folding of the dough.

The danish braid recipe calls for only half the recipe of the pastry dough. I went ahead and made the full amount and placed the rest in the freezer for a later time, thinking this is going to be good, and just may want to make another!

With the fall weather upon us, I decided to go with an apple filling instead of the recommended  apricot, prune or berry jam, topped with a confectioner's cream or almond filling. I also forwent the coffee glaze (made from coffee and powdered sugar), one - it did not sound good to me, two - it doesn't need it - before baking, the pastry is topped with almonds and sugar.

This was good. I thought it tasted even better the following day; and the boys at the shop devoured the rest - one, whom is watching what he eats, said it was so good, he had two pieces. :)

I'm happy I have more dough on-the-ready in the freezer. I'm looking forward to making pinwheels filled with maybe a pear-cranberry filling, spiced with cardamom. Sound good?


The beginnings of the apple filling.


I had enough dough from the scraps to make a pinwheel (OK, enough for two, but I ate that dough).

 How cute are pinwheels?!! I wish I had made all pinwheels. Next batch!


Please visit my fellow bakers to see what version they have baked up. You can find their links on the LYL: Danish Braid link over on the Tuesdays with Dorie website.

Tuesday, October 15, 2013

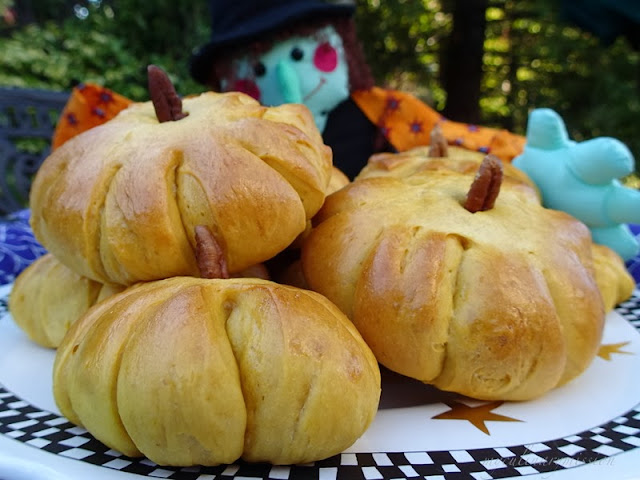
Pumpkin Dinner Rolls

Recipe found at Beyond Kimchee.


How cute are these?! They would look adorable on a Halloween buffet, or beautiful on the Thanksgiving table don't you think?

Not only are these pumpkin shaped, but they are made with pumpkin puree as well. However, there was not a discernible pumpkin flavor in these rolls - the recipe only calls for one cup - I am assuming more for coloring than flavor. They had the taste of your typical sweet dinner roll. 

These are really easy to make. If you feel you don't have the time to make the bread dough, or just not a fan of pumpkin, I'm sure you could use the refrigerated bread dough from your market or use your favorite bread roll recipe and shape accordingly. These would be just as cute without the yellow coloring.


After cutting your dough in several pieces and rolling the pieces into balls, the recipe instructs you to take a knife and make eight slits in the dough, leaving the center intact. I found it easier to use kitchen shears to achieve this. (I was in a hurry when I made these. Next time I would take more care in forming of the balls - stretching the dough smooth, for the imperfections show in the final product. )

After forming all your little pumpkins, poke a whole in the center of each with your little finger. This is where the "stem" will go once they come out of the oven.

 After the final rise, the center holes closed up a bit. Just poke them again before placing into the oven.

For the "stems" of the pumpkins, you slice the pecan halves lengthwise. You will have two stems from one pecan half. Once the rolls are out of the oven, place a stem where you poked the holes.


 Would you like a roll my sweet? Heheheheeee..

These rolls were more dense than I like my rolls to be. This may have been due to me overworking the dough. Still I enjoyed these, and they were fun to make. I'll have to give them another try - maybe try a plain bread version next time.


Wednesday, October 9, 2013

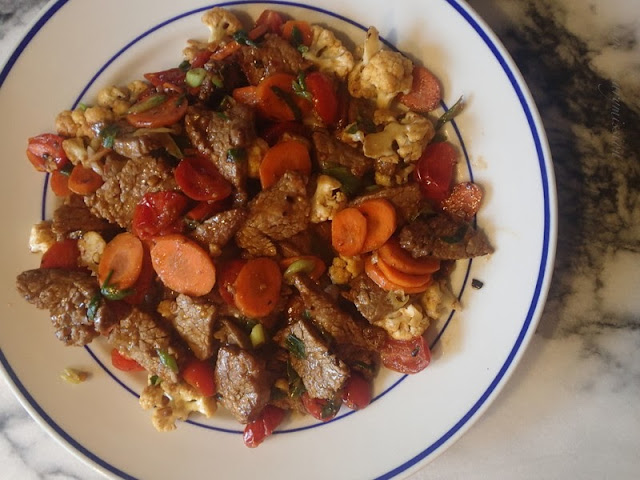
WW: Stir-Fried Cumin-Scented Beef with Vegetables

Wok Wednesdays wokking through Stir-Frying to the Sky's Edge
by Grace Young


The preparation of this dish was quite different from past recipes. Before beginning the actual stir-frying, the meat is first blanched quickly (15 seconds) in hot oil, then removed with a metal skimmer and placed on a paper towel-lined plate or bowl - this will ensure removal of any excess oil.

This blanching technique, called jau yau, or "passing through oil" makes the meat quite tender, not to mention that it gives my wok a beautiful sheen - much like when I give it a wok facial.

Though cumin is one of my favorite spices, I did miss the flavor that other stir-fries have from adding a broth mixture or hoisin sauce mixture at the end. 

The cauliflower was a nice change from the usual vegetables, and with the beef, carrots, and tomatoes, this made for a satisfying one-dish meal - no additional sides needed.


 Mise en place

Bowl 1: Oil 

Bowl 2: Flank steak, cornstarch, soy sauce, dry sherry, oil 

Bowl 3: Garlic, crushed red pepper

Bowl 4: Carrot, cauliflower, cherry tomatoes 

Bowl 5: Salt

Bowl 6: Cumin (One of my  f a v o r i t e  spices!)

Bowl 7: Scallions

Bowl 8: Salt


Oh how I miss the natural light of summer...

Well it certainly looked to be enough leftover for Andy's lunch the next day - but we finished it off. 


One rule of the Wok Wednesdays group is we are asked not to post the recipes here on our blog. If you would like the recipe, you will find it on page 74 of Stir-Frying to the Sky's Edge, which you can purchase at your local bookstore or find it at your local library. You can also get the recipe here. However, I highly recommend purchasing the book - you won't be disappointed. 
 
Wok Wednesdays is an online cooking group. If you would like information about joining us, click here, or visit us on Facebook. Would love for you to wok along with us!


Sunday, October 6, 2013

Mixology | The Dirty Nipple


Seriously who makes up these names? Dirty Nipple, Boot to the Head, Urine Sample, and others I do not feel comfortable repeating here - it must be a bunch of people sitting around whom may have had a bit too much. 

I found this drink on drinksmixer.com. I just typed in Sambuca, (this I received almost a whole bottle of from my sister who purchased it for a recipe and used maybe a couple tablespoons; and which I needed almost a half cup for a recipe I was making, and asked if I may have some). I had everything else needed to make this drink. In addition to the Sambuca, you need Baileys (this was gifted to us last Christmas) and Kahlua, this we always have on hand for we like our White Russians.

Don't you love it when you can use up what you already have on hand and no need to purchase something else you may not use again?

According to drinksmixer.com you layer the components (equal parts) in the following order:

Kahlua (A chocolate liqueur with a 20% alcohol content - except in Ohio where it is 21.5% - interesting. )

Sambuca (An anise [licorice] flavored liqueur with a 47% alcohol content - it feels warm going down.)

Baileys (An Irish whiskey and cream based liqueur with a 17% alcohol content.)

As you can see from the photo, a mixologist I am not. This should be a layered drink. Three layers to be precise. I even used the trick of pouring over the back of a spoon - slowly, maybe it would be easier if I had the little pour spouts bartenders have on their bottles, like the ones I use for my olive oil bottle.

This was tasty drink, but I'll stick with my White Russians. For those of you not familiar with a White Russian, it is made up of Kahlua, cream, and vodka. Delish!


 Second attempt. Two out of three layers is not bad for a first timer!

After my failed attempt at layering, I did a quick search and found that the higher the proof of your alcohol, the lighter it will be. Good to know!

Of course you would want to start with the heaviest and end with lightest. However, according to the recipe on drinksmixer it is not applying by those rules. I may have to try this again following the rules of science. :)

Should you try this one yourself, please let me know how it worked for you and what you thought of this drink.

Cheers!


Tuesday, October 1, 2013

TWD: X Cookies

Tuesdays with Dorie baking through Baking with Julia
by Dorie Greenspan
Contributing Baker: Nick Malgieri 


Tic-Tac-Dough anyone?
I know it was O's turn, however I only made one O, silly me.

These were time consuming, back breaking and unfortunately a big disappointment (to me).

I was so looking forward to making these. I  l o v e  fig newton cookies, and the book states these are reminiscent of those. Though they have a lot more to them besides figs (one of my favorite fruits) - golden raisins, almonds, chocolate, dark rum, and candied orange peel. Sounds delicious doesn't it?

It's a bit early in the year to find candied orange peel - however, it's abundant during the holidays - just a couple of weeks too early. I did find a specialty store a few cities over that carries it for $12.50 for a half pound. In the end I decided to make a batch myself. It was easier than I thought it would be. There are several recipes out there - some easier than others. The easiest was a recipe by Martha Stewart (interesting, if you Google "candied citrus martha stewart" she has two or three different ways of making it- hmmm); and if you choose to make your own, the leftovers are wonderful coated in dark chocolate. 

I really wish I went with my original thought of making only half the recipe. Really, who needs five dozen cookies around? Well, I thought since we were close to the holidays, I could freeze some of them, send some into work with Andy, take some to our daughter, my sister, you know, share the love. Not to mention, if they turned out anything close to a fig newton, I would have devoured a dozen easily myself (there is a silver lining to everything!).

The cookie part was extremely dry and crumbly - not soft like fig newtons - and as is the norm with recipes in this book, with all that went into these cookies, they were not very flavorful. I did only bake half the recipe (the rest of the dough and filling went into the freezer - not sure why), which I was about to toss into the garbage, but the hubby said he would still take them into work. I hesitated at that - I have my reputation to think of after all. I did let him take them to work - I only hope I can show my face at work tomorrow.

Update: They were a little better the next day - the cookie was not as dry and crumbly, though the flavor did not improve any. I don't think these were worth the time and energy spent, not to mention the cost - dried figs, nuts, rum - not cheap.

Update 2: Hubby came home without my container. I said to him, being you did not bring the container home, it must still be full, nobody liked them. No! Everybody but one guy, loved them! Even a customer, who asked if these cookies were Italian, she herself is Italian, and enjoyed them. Go figure. Must be me.


I'm not sure why the instructions say to roll the dough into a 12-inch rope, only to roll out the dough to a 3x12 rectangle. Any rolling of the dough will stretch it beyond 12 inches. I made the ropes approximately ten inches long before rolling out.

As tedious as these were, there was a fun factor to them. If only they tasted good. I don't mind a little hard work for recipes that turn out downright delicious, such as the Hastskor (horseshoe) cookies I make at Christmas.


How cute is this tray?! I got the idea and instructions from this website, that my niece Shannon  (whom is a fabulous photographer) "liked" and it showed up in my FB newsfeed.

I wish I had taken a picture before I ate most of it! Candied orange peels also taste great covered in dark chocolate - dangerously addicting. Our daughter gifted us some one Christmas and I think of it often. Now that I know it isn't really that hard to make, I will do so again. You can also use it to top desserts, use as a garnish for drinks (spirals would be cute - they are soft to begin with, and dry hard - maybe shape them around a straw?), throw them into bread batter, top your ice cream or yogurt, even add it to your favorite granola recipe, or just eat it plain like I have been. 

To see results of this recipe, or other versions the talented bakers of our group have come up with, visit the Tuesdays with Dorie site and look for the LYL: X Cookies post for links to their sites.