Showing posts with label cake. Show all posts

Tuesday, April 14, 2015

TWD | Baking Chez Moi | Limoncello Cupcakes

Tuesdays with Dorie baking through Baking Chez Moi
by Dorie Greenspan


I was so excited to see the recipe I nominated was chosen. Love, love, love, all things lemon!


The cupcake batter consists of flour, baking powder, cardamom (love cardamom! though I did not detect it at all in the finished product), salt, sugar, lemon zest, yogurt, eggs, limoncello and oil. A small amount of batter is placed in the cupcake liner, then topped with a teaspoon of (optional) lemon marmalade, then covered with the additional batter.

All I could find was orange, lime, or a blended marmalade. I was going to use lemon curd in place of the marmalade, but I could not stop thinking of the marmalade blend, that was made up of orange, lemon, and grapefruit, so I went with that.

The baked cupcake is then brushed with a limoncello/simple syrup mixture while the cakes are still warm; I poked a few holes in the top of each cupcake to allow the syrup to really seep into the cakes.

The frosting is made up of butter, powdered sugar, limoncello, and lemon juice.
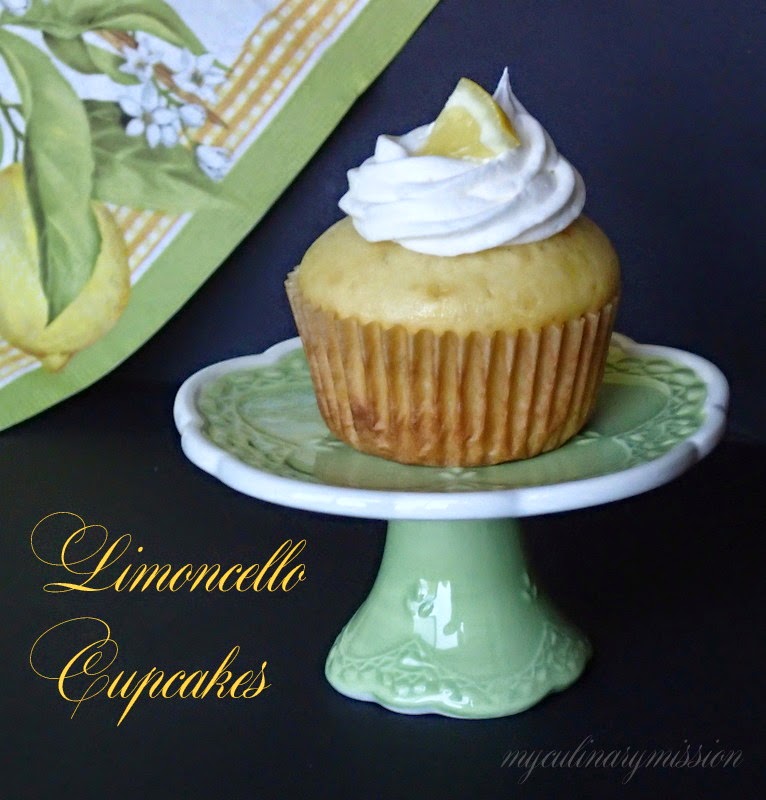

These really need a prettier cupcake liner. I have whole box of pretty wrappers that my daughter gifted to me; but I was rushed, and didn't even think about it, until I pulled them out of the oven. Grrr.

I so wished I went with the lemon curd filling... the marmalade was too bitter for my liking. I was also surprised, between the lemon zest, lemon juice, and limoncello, that these did not have a stronger lemon flavor.

This seems to be an issue with my quest for the perfect lemon cupcake. I want a lemon cupcake that makes you pucker up, literally; I want that intense lemon flavor, you know, the one that sends you to the moon and back.

Still searching for the ultimate lemon cupcake...

If you have such a recipe in your repertoire, please leave a link in the comments below! I would be forever grateful! :)


We have been asked not to post the recipes here on our blogs. You can find the recipe on page 194 of Baking Chez Moi.

Do check out my fellow bakers results, by clicking here for a list of their links.


Wednesday, January 28, 2015

TWD | Baking Chez Moi | Brown-Butter-and-Vanilla-Bean Weekend Cake

Tuesdays with Dorie baking through Baking Chez Moi
by Dorie Greenspan


Sorry to say, I am short on time - so this is going to be quick, as were the photos, taken just before I left for work, hence the poor lighting.


This loaf cake has a similar texture to pound cake, but not as heavy. It is made with the typical ingredients of flour, baking powder, salt, sugar, eggs, butter (which as been boiled until it turns a rich caramel color), vanilla (four teaspoons! if not using a vanilla bean), heavy cream, and optional rum.

Unfortunately, the brown butter and vanilla flavor was lost by the over-powering taste of the rum - partially my fault, for I'm sure I added too much rum - measuring over the bowl, the first tablespoon overflowed.

The cake had a somewhat dense, spongy texture, with a sweet crispy crust (my favorite part). Dorie mentions that this is lovely toasted as well, should it last long enough to go stale.  Should I get the time, I would like to make this again, minus the rum altogether, for I think the vanilla and brown butter would lend a delightful flavor to this loaf cake.

Head over to the Tuesdays with Dorie website and look for the LYL link for this cake to see how the other bakers fared with this recipe.

It is the rule of TWD not to share the recipe on our blogs. You will find the recipe on page 6 of Baking Chez Moi; it is however, available on Google books.


Wednesday, March 26, 2014

TWD: Mocha Brownie Cake

Tuesdays with Dorie baking through Baking with Julia
by Dorie Greenspan
Contributing Baker: Marcel Desaulniers


I have to say, I was so excited when this recipe was chosen. Not only for the fact that the recipe comes from Marcel Desaulniers (of which, at last count, I have five of his books), but also, I love chocolate. I love brownies. I love ganache. Sounded like a winner to me!


How does one expect to cut a cake, that is not even two inches high, into three layers? I have Liz of That Skinny Chick Can Bake, to thank, for her clever tip of using toothpicks inserted into the sides of the cake, to use as a knife guide. Thanks Liz!!


I did not quite have enough ganache to frost the cake completely. I ended up having to add an extra three and a half ounces of chocolate, and a splash of half-and-half to the remainder ganache in order to have a sufficient amount.

This is the first time for me, making a ganache where butter is added. I have always made it with just chocolate and cream. The butter does add a bit of richness to the ganache (as if ganache isn't rich enough already).


The photo makes this cake look moist and delicious. However, I felt the cake was too dry. Apparently so did the boys at the shop. Normally sweets like this disappear in a heartbeat. There was still about half the cake left over when I went in the next day. By the end of the day, it was still there... sad to say, into the trash it went.

I felt this was too much work for the outcome. I'm sure there are better recipes out there. And interestingly enough, this recipe is not in any of Mr. Desaulniers' books that I have.

This may not have been a hit, but his other recipes have been:

One of my favorite recipes of Mr. Desaulniers' is his Ebony & Ivory Truffles, from his book Death by Chocolate - those are to die for - I'll have to remember to share those with you one day; and his Sliced Beets with Curly Endive, Red Bliss Potato Salad, Honey Mustard Roasted Walnuts and Meaux Mustard Vinaigrette from his book Salad Days, is delicious too!


It just so happened, the day I baked this cake, it was my sister's birthday. She was on her way over to pick up her camera, and I had a slice of cake, complete with candle, to send home with her.

If you would like to attempt this recipe yourself, you will find the recipe on page 282 of Baking with Julia, or the recipe can be found on the Chicago Tribune website.

Do be sure to visit my fellow bloggers sites to see their rendition of this recipe, by visiting the Tuesdays with Dorie page for their links, listed under LYL: Mocha Brownie Cake.


Wednesday, January 29, 2014

TWD: Vanilla Chiffon Roll

Tuesdays with Dorie baking through Baking with Julia
by Dorie Greenspan
Contributing Baker: Mary Bergin


For such a "simple" cake - having only two main components, it sure did have what seemed like a lot of steps, and used a ton of dishes. I do not recall having the same experience when I made a spiced pumpkin roulade several years ago. (Memories do fade though..)

The recipe calls for a walnut mousse - I had hazelnuts on hand and used those. This of course added an extra step - skinning of the nuts.

The filling is made up of a nut paste, melted chocolate, egg yolks, sugar, water and heavy cream. To make the paste, the nuts are puréed with oil until a paste forms. I think using walnuts would give the paste a smoother consistency. However, I did not mind the texture the hazelnuts lent to the filling.


Add your nut paste mixture to the beaten eggs and fold until incorporated.


Once the chocolate is incorporated, (this is where the whipped cream should have been incorporated as well), then refrigerate until needed.

The instructions say to trim the edges of the cake. I only trimmed the shorter ends - the ones that will be exposed. Though that may have been unnecessary - for once the cake was completed, I trimmed the ends again, to give it a cleaner appearance.

The recipe states that the mousse may be made one day ahead. Refrigerate, and stir before using. I chilled the mousse only for the time it took to make the cake. It was solid. No amount of stirring was going to make this spreadable. I placed my bowl (stainless steel) over a burner until it was at a consistency that could be spread easily.

However, this ruins the fluffy texture you have with a mousse. Still, the filling was quite tasty.


The assembled cake, ready for chilling.

I recommend letting the cake come to room temperature before decorating. In the time that I sprinkled the powdered sugar and cocoa on, and moved the cake to the other side of the counter to take a picture, the powdered sugar had already started to dissolve.

If my mousse had turned out the way it was supposed to, there would have been a lot more filling to cake ratio. (Upon re-reading the recipe as I type this, I just realized I forgot to add the heavy whipping cream to the filling! Oops.)

The cake is soft, moist and has a pleasant vanilla flavor from the addition of two tablespoons of vanilla. Do make sure to use a good quality, pure vanilla, not vanilla flavoring for this cake. I was fortunate enough to use homemade vanilla that our daughter had gifted me.

I liked the flavor of the hazelnut filling - better than I would if I had used walnuts, I'm sure. Even with both the cake and the filling being tasty on their own, I felt the completed roll tasted rather plain. The cake definitely would have benefited if served with some sort of sauce - raspberry, chocolate, or even some whipped cream. (Or maybe even the inadvertently omitted whipping cream.)

The recipe states this will serve six. The finished roll, after trimming was about sixteen inches long. This will easily serve ten to twelve, unless you want extra large slices. 


To see the results, and other versions of this cake from all of the talented bakers in the group, click here for their links, or go to the Tuesdays with Dorie website and look for the link: LYL: Vanilla Chiffon Roll.

You can find the recipe by clicking here, or on page 277 of Baking with Julia.


Monday, October 28, 2013

Spider Cakes - Not Just for Halloween

Recipe credit: Not Martha


I'm a bit late jumping on the Halloween bandwagon; with Halloween falling on Thursday this week, most parties were held this past weekend. But for the lucky few, who will be throwing a party the weekend after Halloween, this is for you!

And these don't need to be just for Halloween - maybe you are having a dinner party for that entomologist or arachnologist in your life, or a child's creepy crawly party, or just because - because they are too darn cute.


Don't fill your cavities more than half full; you don't want a dome to form. If you happen to get a large dome, just take some dental floss and cut them off so your spider will sit level.


Make sure to grease and flour your pan well. Some bakers swear by the baking spray with flour. I have not used this product; but as you can see in the upper right-hand photo, I had problems with two of the six sticking to the pan.
 
I found this cute idea over at Not Martha. She mentioned she wished that she had glazed the cake. Personally, I think it looks better left plain. She also filled her cakes with whipped cream and a raspberry coulis.


If you don't want to glaze your spiders, and don't want to deal with filling them with cream and fruit as Megan at Not Martha did, you can always pipe some of the frosting into the cake itself by inserting a small decorating tip into the bottom of the cake in two or three places.

The cake recipe I used is from the back of the Hershey's cocoa powder container. It is so soft and moist, it really doesn't need much icing. For the head and legs, I used Betty Crocker tub frosting (gasp!) So unlike me to use a packaged frosting. Normally I would make a ganache for this - but laziness won out.

For this recipe I used a Wilton mini-ball pan, and made only half recipe of the Hershey's cake recipe - this yielded six spider bodies, with a little left over - maybe enough for one or two more bodies.

Staying with the spider theme - here is a picture of a tarantula we saw on our hike this past weekend. :)


Saturday, August 3, 2013

Cakes: A Short Jaunt Down Memory Lane


One blogger I follow, Dawn, of Simply Sweet, makes amazing cakes! She really needs to open her own bakery. (People use to tell me the same thing, but my cakes were nowhere near the perfection of hers - they were all probably just being nice.) 

Looking at her latest had me reminiscing of the cakes I made for our daughter's birthdays. Her parties were small productions, planned months in advance. Those days were fun!

Our daughter is now grown, recently college graduated, employed (and, in her field of study no less!) and out on her own, becoming a self sufficient, wonderful, caring, and loving woman. She truly is amazing.

I know we have done well raising our daughter, just by seeing who (or is it whom?) she has become and watching her succeed in life.

That is what it's all about isn't it? Having that sweet child to love, play, and grow with, which you hope will be for an eternity, but turns out to be such a short time (goes by way too fast). Raising your child to become nurturing, caring and respectable citizens themselves, and then responsible enough (and willing (she had no problem!), to leave the protective nest. 

Well, we have succeeded, and we are proud. Though there will always be that part of me that still wishes that when I go to bed at night, and wake up in the morning, that she is safe in her room down the hall..

Love you, Ash.

A few of my favorite cakes (photos of not so great quality photos - if I only knew what I would be doing today, 20+ years ago):


We threw a pool party for her 2nd birthday party. I recall when I gave birth that it was hotter than hot, and quite warm for her 1st as well. This year of course it turned out overcast and sprinkling! Good thing we also had one of those jumping apparatuses for the kids to play in.

The people are made from royal icing and the inner-tubes are mini chocolate donuts.

 The Emerald City I made from paper towel tubes and wooden balls (oh, how fun it would have been to make an edible Emerald City!)


 This has to be my favorite of favorites. :)

 Teddy Bear Picnic party. My first attempt with fondant & marzipan.

The year (10th) Ash and her friend Tiff made the cake. How could we have forgotten to take a picture!?! This is the drawing I did in the scrapbook. It was a chocolate cake with white frosting in the center and the only icing on the outside was the pumpkins and vines. It really was stunning and delicious.

 This one I did for my nephew's 6th birthday.

Ah- memory lane. That was fun.


Thursday, June 20, 2013

Book Ninety-Nine: Great Coffee Cakes

by Carole Walter


There are so many delectable sounding baked goods in this book (Country Cherry Honey Scones, Apple Walnut Strudel, Pineapple Cheese Braid and Macadamia Fudge Squares), and this would not have been my first choice (more than likely I would not have chosen it at all), except I had a few bananas that desperately needed to be used up.

I was actually looking for a quick banana bread recipe - which I have one that I like a lot, but thought if I could knock out another book from the shelf, I would be a happy camper; enter Banana Chocolate Chip Cake.

I was still in the mind-frame of "quick" as I was pluggin' away with this recipe. This is not quick - not terribly labor intensive - but a bit more than I was hoping for and used up a lot more dishes and equipment.

First you butter and flour your pan, and set aside. Mix your dry ingredients, and set aside. Mix the puréed banana and yogurt (which you use your food processor and a strainer), and set aside. Mix the butter and sugar in the mixing bowl of a stand mixer - yep - a lot of dishes.

I loved this batter from the beginning. First I thought, what a pain to add the sugar a couple of tablespoons at a time, but it turned out so smooth and fluffy. Then after adding the dry and wet ingredients (alternately), it had a soft, light, pillowy texture to it.

The recipe calls for banana extract - I have never seen, let alone hear of banana extract. I omitted this, as well as the vanilla extract (in error). Still I thought the cake had a nice light banana flavor. I think if you use really ripe bananas as I did, you don't need the banana extract, unless you want a strong banana flavor.

In no way is this heavy like your typical banana bread. This has a soft, airy, light texture to it. However, if I was to make it again, I would bake it in the middle of the oven, rather than the bottom third of the oven. The bottom of the cake (which is the top when turned out of the pan) was more browned than I like and was a bit dry. I even took it out ten minutes sooner than the lower suggested cooking time. I would probably have taken it out earlier if I were in the kitchen at the time.

Aside from the top of the cake being a bit dry, which is easily fixed with a shorter cooking time, I really enjoyed this, and I hope my sister's co-workers will too.

Success meter (1-3): 3


amazon
I also have her Great Cookies cookbook which I love. I'll probably be posting on this book closer to the Christmas holiday. 

She has you sift the flour before measuring.

I did not have mace, so I substituted nutmeg. "Mace is a product of the Myristica fragrans tree - mace is the exterior web-like membrane that surrounds the nutmeg. Mace is normally sold in dried, ground form and used in many cuisines including Indian, Asian and Europe." -(source)

You purée the banana with lemon juice then pass it through a medium-gauge strainer to remove the seeds of the banana. (I'm thinking you can skip the straining part - I would next time- how heavy can they be?)


Butter and sugar mixed until lightened and smooth.

The recipe calls for mini chocolate chips. I was going to use walnuts until I found an opened bag of chocolate chips (very rarely do they make it into baked goods...) and a small block of chocolate from another recipe that I was unable to make (could not find dark chocolate liqueur). I tossed them into the food processor to make them more "mini" like - the block chocolate had no problem breaking up, but most of the chips stayed whole - hmmm.


The "bottom" of the cake looks beautifully golden.

The top, a bit more browned then I like.

Because I like it.


Carole instructs you to spoon the glaze over the cake. I opted to place the glaze in a baggie and snip a corner and drizzle the glaze in as much as uniform lines as I could.

The drippings from the glaze is almost as pretty as the cake!


The center of the cake is delicious. With a shorter cooking time, the whole cake will be delicious.