Showing posts with label dessert. Show all posts

Tuesday, August 11, 2015

TWD | Baking Chez Moi | Cherry Crumb Tart

Tuesdays with Dorie baking through Baking Chez Moi
by Dorie Greenspan


This tart was an all day affair to put together - but with a little advanced planning it can be made over a few days if need be.


There are several ways to pit a cherry if you don't have a cherry pitter - from using a knife to using a paperclip - just do a Google search. Here, I used a decorating tip. Worked great - took me about twelve minutes to pit a pound of cherries. Next time I would pit them inside of a bowl to capture the juices.


Pitting cherries can be quite messy - this method seemed to have minimal squirting when done slowly.

If you want a less messy and faster way to pit cherries, you can lay the cherries out on a rimmed cookie sheet or on a board, and place a piece of parchment over them, and tap them lightly with a mallet, as shown in this video. Your cherries won't stay whole (many of mine did not anyway) as Dorie prefers, but for this dessert, I really don't think it would matter all that much.


After partially baking the crust, and letting it cool to room temperature, it is filled with an almond or hazelnut filling made from butter, sugar, nut flour (I just ground up some hazelnuts), cornstarch, egg, and kirsch (or vanilla extract) - I subbed cassis. The pitted cherries are placed atop the filling and baked until the filling puckers up all around the fruit.


If cherries are unavailable, I'm sure any fruit, from blueberries to peaches would work here. 


A streusel topping made from sugar, orange zest, flour, salt, cardamon, butter, and vanilla extract, is sprinkled over the top and baked once more until lightly golden.


Dorie recommends serving this at room temperature the same day it is made. Her husband however, prefers it cold from the fridge, and I agree with him. I thought it was really good cold - so this would make a good candidate for a make ahead dessert.


We have been asked not to post the recipes here on our blogs. You can find the recipe on page 148 of Baking Chez Moi, or over at Google Books.

You can check out my fellow baker's results, by clicking here for a list of their links.

Tuesday, April 28, 2015

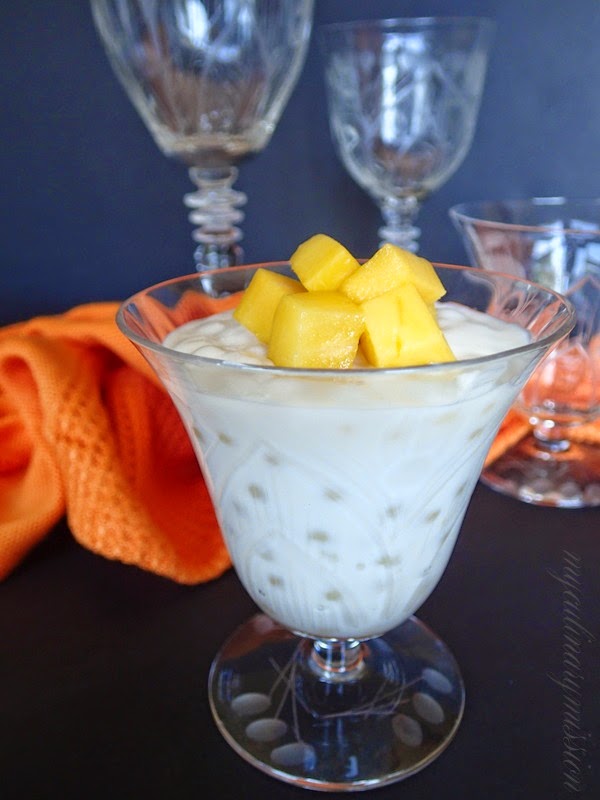
TWD | Baking Chez Moi | Coconut Tapioca

Tuesdays with Dorie baking through Baking Chez Moi
by Dorie Greenspan


I knew tapioca as a type of pudding, which I have never had before this, but beyond that I knew nothing about it.

Just what is tapioca exactly? Well, it's a starchy tuberous root of all things, also known as cassava. It is one of the purest forms of starch food. Tapioca is also used as a thickening agent. Many refugees in Southeast Asia actually survived on tapioca during World War ll.

Did you know you can actually make your own tapioca pearls if you can not find them? A quick internet search will show you how.


Like I said, I never had tapioca pudding before. I was expecting it to be pudding like - smooth and creamy (aside from the little balls of tapioca). Which it was, until I refrigerated it. Then it turned gelatinous, Jell-O like, but firmer. So firm, that you would be able to cut it with a knife, and serve little squares of it - which could be fun. Maybe.

My sister was coming to dinner the following evening, and I asked it she ever had tapioca. Yes, she had, and she loves it! Couldn't wait to try mine. The consensus was, it had good flavor, but it is supposed to be soft and creamy, not firm.

Hmm. Maybe I overcooked it? I cooked it until it was the texture of (non-Greek) yogurt, as instructed. I have some tapioca pearls leftover, I'll give it another try, cooking it for a shorter time.


We have been asked not to post the recipes here on our blogs. You can find the recipe on page 382 of Baking Chez Moi, as well as on Google Books.

Do check out my fellow bakers results, by clicking here for a list of their links.


Tuesday, February 10, 2015

TWD | Baking Chez Moi | Marquise au Chocolat

Tuesdays with Dorie baking through Baking Chez Moi
by Dorie Greenspan


This weeks installment is Marquise au Chocolat; a chocolate mousse. Dorie's version is frozen. I have made chocolate marquise in the past, and reviewing other recipes, this is the only one that I have come across that is frozen.

Dorie mentions this is exceedingly practical, for you can use what you need for one occasion, and keep the rest in the freezer for the next celebration (should it happen within a month or so). 


The recipe actually calls for the chocolate marquise to be molded into a standard loaf pan, and is served in fairly thick slices and adorned to your liking, if at all.

I had come across this cool idea for a chocolate doily, and just could not pass up the opportunity to make one myself. So fun!


I formed the chocolate mousse using ring molds that I had purchased for another dessert, that I made for an Oscar party a few years ago (it too, just so happened to be a chocolate tricolor mousse).


And, being I had some melted chocolate left over, I made this version.


This dessert when completed, is basically a blank canvass - you can decorate it to your hearts content; as I did here, or just with a dusting of cocoa powder, or my original idea, when I thought I was going to make the loaf pan form, I was going to put a line of chocolate leaves down the middle, dotted with raspberries. I also think that a tart raspberry sauce swirled on the bottom of the plate would be nice addition.

Your options are truly limitless. Let your imagination run wild!

If you would like to make a chocolate doily, or a chocolate wrap-around, click here for an awesome tutorial by Julia M. Usher of Recipes for a Sweet Life.


Note: Dorie's recipe does not use cooked egg yolks. If you do not have a trusted source for organic eggs as Dorie suggests, or just feel uncomfortable using raw eggs, click here for instructions for an egg-safe alternative.

I halved the recipe and it yielded seven ample servings (the dessert is on the rich side - small portions are a good thing here). The dimensions of the ring molds I used are 1-3/4 inches x 2 inches.


Do head over to the Tuesdays with Dorie website and look for the LYL link to see how my co-bakers styled their Marquise au Chocolate!

It is the rule of TWD not to share the recipe on our blogs. You will find the recipe on page 357 of Baking Chez Moi.


Saturday, November 29, 2014

TWD | Baking Chez Moi | Cranberry Crackle Tart

Tuesdays with Dorie baking through Baking Chez Moi
by Dorie Greenspan


This cranberry crackle tart may look fancy, but really, it is unbelievably simple.


The filling is made up of just two egg whites and some sugar and salt, and whipped until soft peaks are formed. Then fresh cranberries are carefully folded in. Next time, I would add more cranberries.


The meringue mixture is placed in a pre-cooked tart shell made with a sweet tart dough that has been spread with jam - Dorie suggests chunky cherry, raspberry, or strawberry. I used a sour cherry and rhubarb jam.


I used the back of a spoon, by pressing it into the filling and lifting up, to give it it's fluffy, swirly texture. 


It may not look like much, even Dorie mentions in the book that this tart is homey looking. 


This made for a nice light dessert after our always, overabundant Thanksgiving meal. Everyone said they enjoyed it - I may have liked it more if I used more cranberries and jam. I found it to be rather bland. 

Visit my fellow bakers to see how they fared with this recipe by clicking here.

It is the rule of TWD not to post the recipes here on our blogs. However, the recipe can be found online here.


Tuesday, September 2, 2014

TWD: Oven-Roasted Plum Cakes

Tuesdays with Dorie baking through Baking with Julia
by Dorie Greenspan
Contributing Baker: Marcel Desaulniers


These little cakes could not be any simpler to prepare, and what a great presentation they make too!


Two of my plums were a little riper than I would have liked them to be for this recipe - they tasted fine, I just preferred the texture of the firmer plum after baking.

The batter for this cake is pretty straight forward - butter, sugar, eggs, flour, baking soda, and vanilla, with the addition of buttermilk and orange zest.

Oh my! The aroma of the batter was amazing. The scent of the vanilla and orange was intoxicating - a little aromatherapy was going on here.


After buttering the ramekins, I took the extra precaution of lining them with a circle of parchment paper - I have this fear of baked goods sticking profusely. Not sure it was really necessary - I had buttered the dishes pretty well - they released quite easily, edges and all. 


Each ramekin is filled with two tablespoons of batter, then a half plum is placed on top (cut side up) and lightly pressed into the batter - not too deep, for you want the plum to show after baking; each plum is sprinkled with about a tablespoon of light brown sugar before baking.


It was a little tricky getting the cakes out of the ramekins while warm, the edges of the cake will crack. I even let one cool completely, still it cracked, though not as bad. I just pressed them back to gether ever so gently. That is where some whipped cream comes in handy - to hide any imperfections that may occur - as Mr. Desaulniers himself does, as shown in this video.


These little cakes are a deliciously sweet treat - the cake part was soft and moist, with a crunchy exterior, a nice contrast to the soft warm plum in the center.

Surprisingly to me, my husband even liked them! He has never really been a dessert person. Maybe it helped that he had this at breakfast with his coffee.


These really are best served warm, as recommended in the recipe; though they can be stored at room temperature for a day, wrapped airtight. We had these two days later (I refrigerated them after the first day), and they reheated nicely in a 350° oven for about ten to fifteen minutes.


These little jewels are on the sweet side - a little unsweetened whipped cream would help curb the sweetness. You could also probably cut back on the amount of sprinkled brown sugar atop the plums. I did not have any whipped cream on hand, so we ate them plain - good thing I do like sweet treats.


The recipe can be found on page 255 of Baking with Julia, or by clicking here.

You will want to visit my fellow baker's sites as well, I'm sure there will be some wonderful variations to the recipe, for there usually are, due to ingredient availability or dietary restrictions.


Monday, July 21, 2014

Book 115: The Pastry Queen | Sugar Saucers

by Rebecca Rather


These are called sugar saucers because they are as large as, you guessed it, a saucer - the plate, not the UFO, that I had imagined.

I was craving something sweet, and wanted something quick and easy. Aside from the hour chill time in the fridge (or fifteen minutes in the freezer) these fit the bill perfectly.


These are basically a sugar cookie. In addition to the normal ingredients of butter, granulated sugar, egg, vanilla, flour, baking soda and salt, this recipe also includes powdered sugar and canola oil.

After the dough has chilled, using a standard-size ice cream scoop (mine apparently is larger than standard - for I only got six cookies instead of twelve), the dough is dropped onto a cookie sheet about two inches apart. The dough is then flattened to about a quarter inch thick. I covered the ball of dough with a piece of parchment paper and used the bottom of a glass to flatten.


Whoa. Two cookies took up the whole sheet pan. Good thing I started out with the pan that had only two on it.


I had four on the first sheet pan. The dough was too soft to transfer, so I cut the parchment and lifted two of the cookies to another pan.


If you look closely, you can see the edge of the cookie peeking out - they are saucer sized! The finished cookies were six inches in diameter, giving me six cookies; as where the recipe states I should have gotten a dozen of four-inch cookies.


I decided to add some sugar to the tops before baking. I left two plain, two were sprinkled with granulated sugar, and two with demerara sugar. I actually liked them best without any sugar.

These cookies were crisp on the outside and chewy on the inside. Perfect in by book. And they seemed to get better with each passing day. 


Being these were so huge, I cut them up shortbread style. These would be a great addition to a potluck - or better yet, even a sit down dinner - put the cookies in the middle of the table and let your guests just break off a piece; there is just something fun, to eating such a big cookie.


Monday, July 8, 2013

Book 100: Bittersweet

by Alice Medrich


I found it fitting that my one-hundredth book be by Alice Medrich. It was Alice's book, Cocolat, a gift from my husband many moons ago that go me started on a baking adventure of a lifetime. I love Cocolat - the recipes are easy enough for the average home baker to make, yet they will impress your family and friends, as I'm sure the recipes in this book will too.

It was hard to pick a recipe from this book. There are so many beautiful and delicious sounding cakes, breads, cookies, (and even a couple savory dishes!) to choose from. Originally I was going to go with Alice's Tribute Cake, a beautiful chocolate cake filled with ganache, frosted with a chocolate glaze and decorated with ruffled chocolate fans. This, has my name written all over it.

 (source)

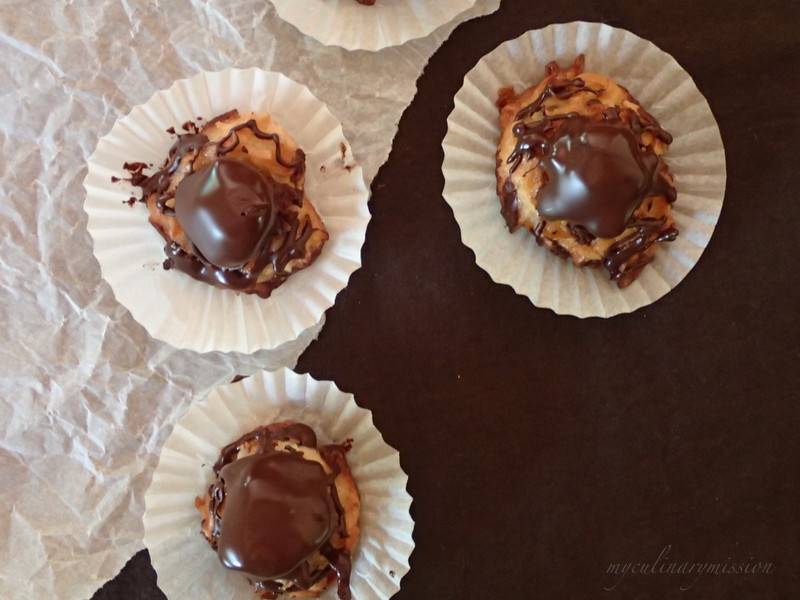
However, I opted for the Coconut Saras. These are a different take on her Sarah Bernhardt cookies from Cocolat. In this recipe she uses a coconut macaroon rather than an almond macaroon (not to be confused with macaron. Though macaron is French for macaroon, they are a different cookie). I must say I do prefer the coconut over the almond (I have made both).

The base of this petit dessert is the coconut macaroon, this is topped with a chocolate ganache, and dipped in, and drizzled with, a chocolate glaze. Yep. Sounds good doesn't it?

As I was finishing these up, our daughter stopped by and she did a taste test for me. Her reaction was "Mmm, I can eat these all day" and frankly, so could I.

Success meter (1-3): 3


To make the ganache, finely chop your chocolate.

Bring some cream to a simmer and pour over the chocolate and mix until smooth.

Let cool before refrigerating overnight.

Oops. I thought I forgot to add all of the chocolate. I reheated the cooled chocolate mixture over a water bath and stirred in the extra chocolate. Only later did I realize this was not the case.

The macaroons are made from sweetened coconut, sugar, egg white, vanilla, and salt. (The leftover egg yolks I will be using to make Alice's recipe for Chocolate Mint Ice Cream!)

Mix macaroon ingredients together in a stainless steel bowl and place in a waterbath, and cook until the egg whites are no longer runny, and have turned from translucent to opaque.


The recipe calls for you to drop by the tablespoons full (I used a scoop approx. 2.5" in diameter - holds about 1 tablespoon). I thought they looked a bit large, so for my second batch I went with a smaller scoop. (Approx. 1 1/8" in diameter.)


I found the tip of a candy thermometer dipped in water worked well to create a hole in the center of the cookie to form the nest shape.


Wouldn't these be cute at Easter filled with mini chocolate eggs? In that case, use the larger scoop.


The chilled ganache. This you whip until it is spreadable, yet firm enough to hold a shape.

This is how it is NOT supposed to look like after whipping! Spreadable? No. I realized later that when the recipe called for half of the chocolate ganache recipe, I used half of the cream, but ALL of the chocolate called for, in a full recipe. Oops. No worries though. It still tasted great, I just was not able to pipe the ganache onto the cookies. Instead, I had to spoon the mixture on.


They would have been cutter if I were able to pipe the ganache onto the cookie rather than having to spoon it on.


You may be thinking that is a lot of chocolate. Not really. In no way is it heavy. The chocolate melts the moment it hits your mouth, and you have this deliciously smooth, satiny, chocolatey goodness that compliments the coconut cookie. It's a bit reminiscent of an almond joy - sans the almond. Light bulb moment!! Add an almond to the center of the ganache!!! Oh yeah.


I can't very well say that I am at the halfway point of cooking through my two-hundred plus books. I have come to the realization that this is going to be a never-ending project, for I keep adding to my collection; this is not a bad thing, not in my book at least.