Showing posts with label yeast. Show all posts

Tuesday, January 20, 2015

Book Fifty-One: Baking with Julia

by Dorie Greenspan
Recipe contributed by Lauren Groveman
(Edited January 2015)


Note to TWD: This post published in 2011 before BWJ. This is not only the first recipe I made from the book, but my first try at bread making, aside from quick breads and rolls.


                                                                           Eastern European Rye

Ahhhh... Julia Child. Many cooks have been inspired by her. I do recall catching her a few times on PBS and she was always a kick to watch - and I have to admit I loved the movie Julie & Julia with Meryl Streep; I even have the DVD.

I have had a longing to make fresh homemade bread but have always shied away due to my fear of yeast which I am slowly overcoming. I have had recent success with Parker House rolls and knotted dinner rolls which have given me the confidence to give this a try.  I think it would be wonderful to have fresh bread to make sandwiches from. Andy always orders his sandwiches on rye so I chose the Eastern European Rye loaf.

Reading through the ingredient list I see that the recipe calls for solid vegetable shortening; something I usually steer away from or substitute butter for. Being that I am not an accomplished bread maker I did not want to do any substitutions on the first run. In regard to the caraway seeds needing to be finely ground, if you don't already have a coffee grinder go out and get one (to be used only for grinding spices). We just recently gave ours away to our daughter since we had not used it in I don't know how long. I tried grinding the seeds in a mini-processor and in a pestle & mortar to no avail - ended up having to make a quick run to Target.

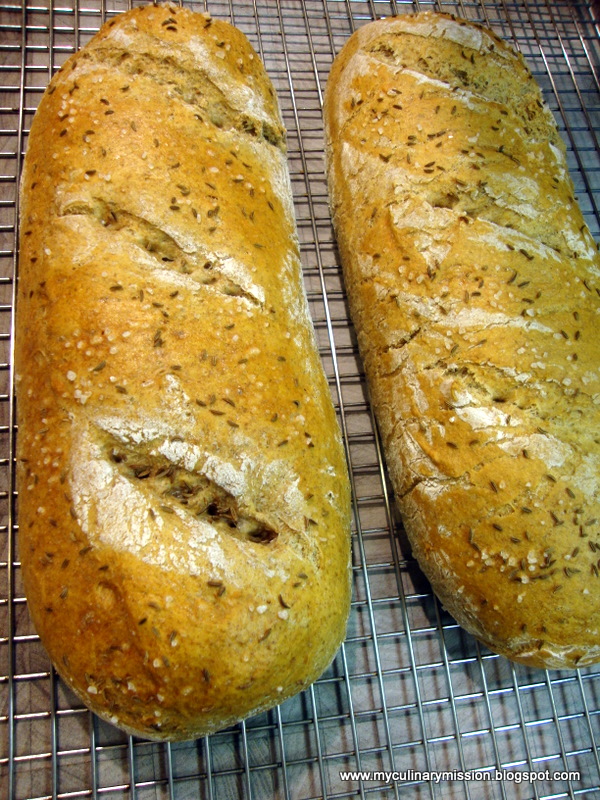
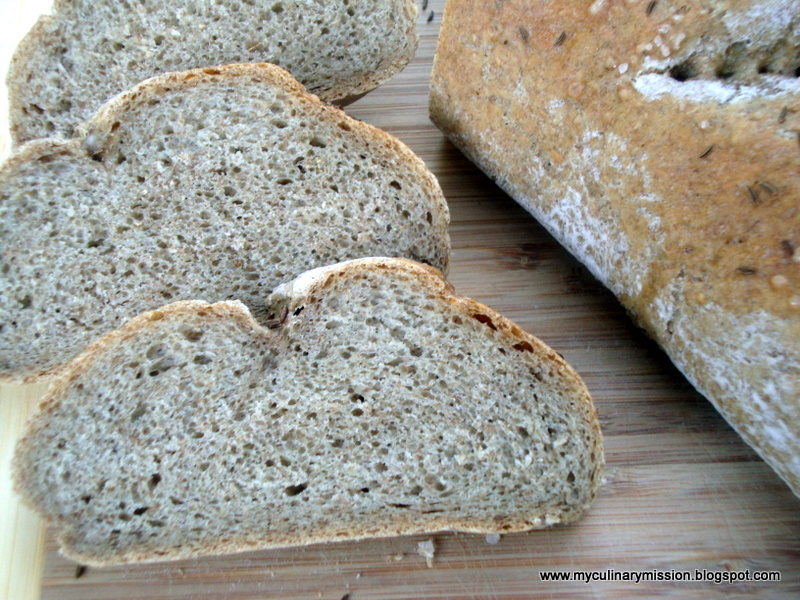
I did it!! I'm so excited! The bread is soft and chewy and the crumb (the pattern of holes inside a loaf) is perfect - no large tunnels running through it.

I think everyone should try making bread from scratch at home at least once. I chose the old fashioned way, kneading by hand, not using a stand-mixer with a dough hook. The scent of the yeast is wonderful and the aroma of baked bread is amazing.

Success meter (1-3): 3


Towels/Slings


Still too seedy after running through
a mini-processor and pestle & mortar.

Much better after using a coffee grinder.


Yeast before proofing.

Yeast after proofing - a bit dome shapped
and creamier looking.


I like to place my dough in
the oven (turned off) to rise.

First rising.

To "punch down" the dough, flour the backside
of your hand and quickly "slap" the dough
with the back of your fingers.


"Pinch" the dough after each roll
by poking the edge with your fingers.


Too fun!
If you will be baking bread often
you  may want one of these.


Apparently, I did not know the trick at the time to making beautiful slashes.

Tuesday, February 11, 2014

TWD: Onion Bialys

Tuesdays with Dorie baking through Baking with Julia
by Dorie Greenspan
Contributing Baker: Lauren Groveman


The bialy (pronounced bee-ah-lee), is similar, yet different than the bagel, and originated in Bialystok, Poland. The bialy does not have the hole in the center like a bagel, but is stretched very thin in the middle with the edges rising above to leave an indentation to hold an onion and poppy seed mixture; whereas bagels are boiled before baking, the bialy is not, it goes straight to the oven.

When I pulled them out of the oven I was disappointed at first, at how brown they were. I knew I should have pulled them out when my olfactory (sense of smell) alarm went off (my sister comes up with the best words :)). I thought they were going to be rock hard. But once I cut into one, and had that first bite, all was well.

They may have been a shade darker than I liked, but they were so wonderfully soft and delicious, not as hard and chewy as bagels.

You can put sautéed onions on anything, and I would probably eat it. I only wish there was more surface room for the onions - well, there was quite a bit, but after baking, the indentation shrunk. A lot.

The dough itself also has sautéed onions mixed in, however they were not very discernible. I would add more next time, along with extra on the outside.
 
These were fun to make; I can see myself making them again (with extra onions of course). It took only about four hours from start to finish. Not bad for a yeast bread! Some can take a full day or two. They really are best the day they are baked - like most baked goods are. The next day they had a staleness to them. However, once toasted they had a new and deliciously different life.

The only issue with slicing them in half to toast, is the filling falls out. Once removed from the toaster, I replaced the onion mixture that fell out - spread it out over the entire surface, then topped it with a poached egg. Yumm!

I still have six more balls of dough in the freezer. I used all of the onion mixture (I love sautéed onions..) on the first batch. So when I make the rest, I'm going to not only fill the middle with the onions, but press some onto the edges as well.


You don't want to brown the onions too much - they will brown more when baked.


Mmm, can't wait..

Oops. No more onion filling for the rest of the rolls. I couldn't imagine using less.

Where did the indentation go? 
I stretched the center really thin, and pricked the hell out of it. I'm not familiar with bialys - maybe this is how they are supposed to be?


Do make sure to check out my fellow (and amazing) cohorts results. You can find there links over at the TWD website, look for the link LYL: Onion Bialys.


Tuesday, January 14, 2014

TWD: Country Bread

Tuesdays with Dorie baking through Baking with Julia
by Dorie Greenspan
Contributing Baker: Joe Ortiz


This is a first for me, making bread using a sponge - a "pre-dough" if you will. It's said, that it gives the bread extra flavor and character.  The sponge in this case, is made up of water, yeast, and three types of flour - bread, rye and whole wheat. Once mixed together it needs to rest at room temperature for six to eight hours, or may be refrigerated overnight (I chose the latter). According to the book, refrigerating the sponge should give a little extra kick of sourdough flavor to your bread.

The sponge calls for two and a half teaspoons yeast. A packet of yeast contains two and a quarter teaspoons - so that is what I used. I recently read somewhere, that if you are refrigerating your dough, less yeast is used. Thinking back, I could have used the required amount for I had to open another yeast packet anyway, to finish the bread.

I was short about a third cup of bread flour to make the dough. I made up the difference with all-purpose flour - either flour can be used according to the recipe. The dough has two rising periods (three, counting the sponge) up to two hours each. Both of my rise times were considerably shorter. The first was done in about forty-five minutes and the final rise was done in a half hour. This must be due to the space heater I use to help warm the kitchen whenever I make bread in the winter.

This is a relatively simple recipe - just give yourself a full afternoon (after starting your sponge the night before) to allow for the rising and baking times.

I was surprised how large this loaf turned out; it was ten inches in diameter, and four and a half inches high. The bread has a soft, light, and moist crumb, with a chewy crust. The bread did not have a sourdough taste - it pretty much tastes like wheat bread.


Here is the dough after its first rise (second, if you count the sponge's rest). That little blob on top was caused by the dough sticking to the plastic wrap.

After shaping the dough as instructed, it is placed (smooth side down) in a banneton (which I do not have) and left to rise again.

A banneton is a type of basket to form bread (typically sourdough) that you coat with flour; the flour not only keeps the dough from sticking, but makes a decorative design on top of the loaf.


Brotform Baskets
(source)


I lined a colander (as suggested) with a baker's couche (you can use a tea towel or any other lint free towel).

Being I do not own a banneton, I wanted to decorate the top of the loaf in some way. I came across some pictures of "bread painting". This is my practice sheet (an artist, I'm not).

 The dough is ready to be inverted onto the baking sheet.


I could not decide if I wanted a lighter or darker "ink", so I made both. I ended up using the lighter first, thinking I can always go back over it with the darker color if needed. I really liked the lighter color and stayed with that, and used the darker, for the center of the flower.

The dark ink is made up of cocoa powder dissolved in very little water and mixed with egg yolk. The lighter, I just added some espresso powder directly to the egg yolk.

 If you have any artistic abilities in drawing or painting (unlike me), the possibilities are endless!

Woah! Turned out a lot darker than I imagined it would. I really liked how it looked before baking. Next time, I'll try using just egg yolk and water alone. If I made rolls, I could have tried different techniques in one shot!

One site I read about bread painting, they have you paint the bread in the last ten minutes or so. I did it before placing the bread in the oven, as is done whenever an egg wash is called for - and basically that's all this is, with added color.


I should have made the flowers larger, to cover more of the bread. But hey, this was my first time at bread painting. I can't wait to try my hand at this again - so fun!

Click here for tutorial on bread painting.

To see results of all the talented bakers in the group, click here for their links, or go to the Tuesdays with Dorie website and look for the link: LYL: Country Bread.